
So far, we have worked with the "watering can": A retention policy always applies to the whole container (the whole mailbox, the whole SharePoint site). Everything in it is treated equally.
But what if you have to differentiate?
- Scenario: In your "Human Resources" department, application documents (have to leave after 6 months because of GDPR) are right next to employment contracts (have to stay for 10+ years).
- The problem: A policy on the SharePoint site would either delete everything after 6 months (disaster for contracts) or keep everything for 10 years (GDPR violation on job applications).
This is where retention labels come into play. They stick directly to the individual file or email like a digital label, regardless of where it is.
- 👉 Mainarticle: Data Lifecycle Management: Data Lifecycle Management
- 👉 tom article: Setting up a retention policy
- 👉 tom article: Publishing labels (label policy)
When to use labels instead of policies
Let's remember: The retention policy is the watering can – it covers everything. The retention label is the scalpel. So be sure to reach for the label if one of these four points applies:
- File-level granularity You have to enforce different deadlines within the same folder.
- Example: In a project folder, "Contracts" (keep for 10 years) are right next to "Drafts" (delete after 1 year). A policy could only protect the entire folder – the label distinguishes file by file.
- Example: In a project folder, "Contracts" (keep for 10 years) are right next to "Drafts" (delete after 1 year). A policy could only protect the entire folder – the label distinguishes file by file.
- Immutability (Records Management) You want to declare a document to be a record .
- The difference: A policy only prevents deletion (the file can be changed in terms of content, the original ends up in the shadow memory). A label can be configured to block editing as well. The document becomes read-only – essential for legally compliant archives.
- The difference: A policy only prevents deletion (the file can be changed in terms of content, the original ends up in the shadow memory). A label can be configured to block editing as well. The document becomes read-only – essential for legally compliant archives.
- Mobility (The rule travels with you) The label is attached directly to the file.
- The scenario: When a file is moved from a protected SharePoint site to an unprotected site, a policy loses its effect. A label, on the other hand, moves with the file, no matter where it is moved in the tenant. The protection remains active.
- The scenario: When a file is moved from a protected SharePoint site to an unprotected site, a policy loses its effect. A label, on the other hand, moves with the file, no matter where it is moved in the tenant. The protection remains active.
- Event-Based Deletion The deadline should not run stubbornly from the "creation date", but from a business event.
- Example: "Delete the personnel file 10 years after the employee leaves" or "Delete the contract 5 years after project completion". Only labels can master this complex logic.
Guide: Create your first retention label
The establishment of a label always takes place in two phases. Think of a physical product:
- Production (Phase 1): We'll create the "sign" (the Label object). It is then in storage.
- Delivery (Phase 2): We hang the sign in the company (Publish via Policy).
Let's start now with phase 1: Define the label.
Step 1: Define the label
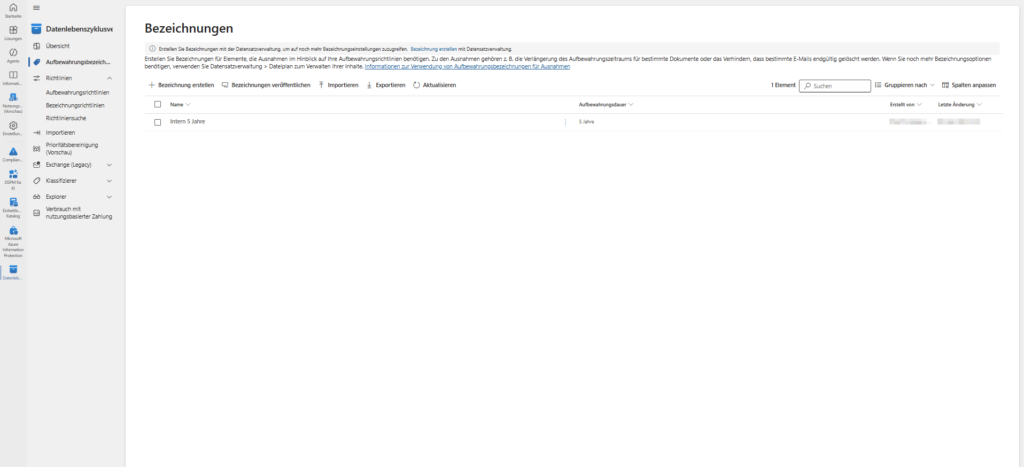
- Open the Microsoft Purview Portal (purview.microsoft.com).
- In the left panel (or via the solution cards), navigate to Data Lifecycle Management .
- Select the Labels tab at the top.
- ⚠️ Important: Don't click on "Retention Policies" here! This is the "watering can" (see previous article). We need the rider for the individual labels.
- Click the "Create a label " button.
Step 2: The wizard in detail
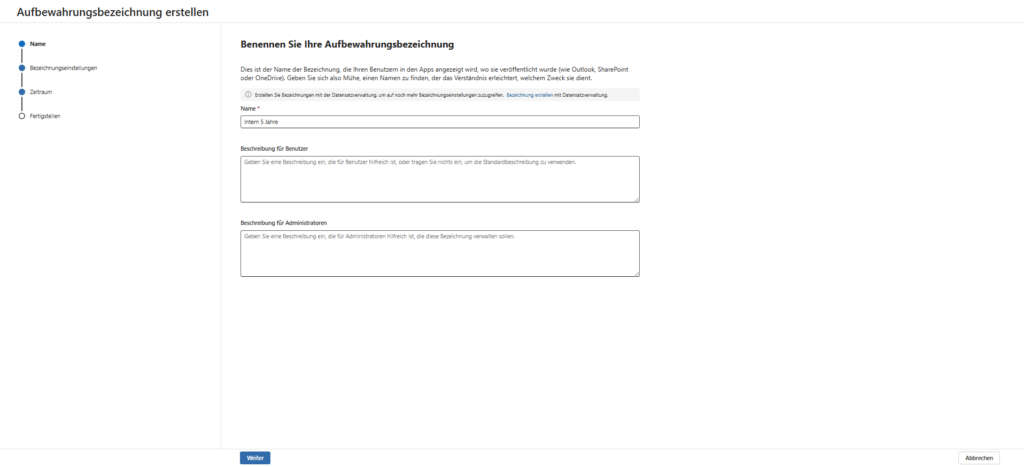
Name & Ease of Use Give the label a name that even the end user in stress understands. The name appears in the drop-down menu in Word and Outlook!
- Bad:
Ret-Lbl-10Y-Fin-v2(Cryptic admin code) - Good:
Rechnungen & Belege (10 Jahre)
Tip: Also use the "Description for User" field. This text appears as a tooltip (mouseover) when the user hovers over the label in Outlook. Write here briefly when this label must be used (e.g. "For all incoming invoices and hospitality receipts").
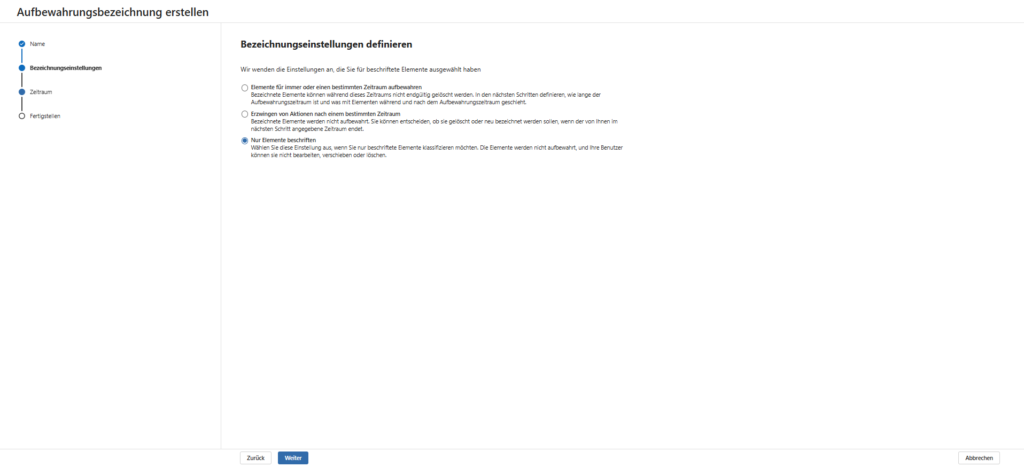
2. Label settings (What does the label do?) Here you decide on the basic function ("The Switch"):
- Keep items forever or for a certain period of time: The classic for compliance. The document is protected from deletion and (optionally) destroyed after the deadline.
- Force actions after a certain period of time: Choose this if you don't want to protect, you just want to clean up.
- Scenario: A "recycle bin fast" label that automatically deletes content after 30 days, but does not prevent deletion by the user until then.
- Label only elements: A pure classification label without a technical deletion or protection function. It is only used to visually organize documents or mark them for search.
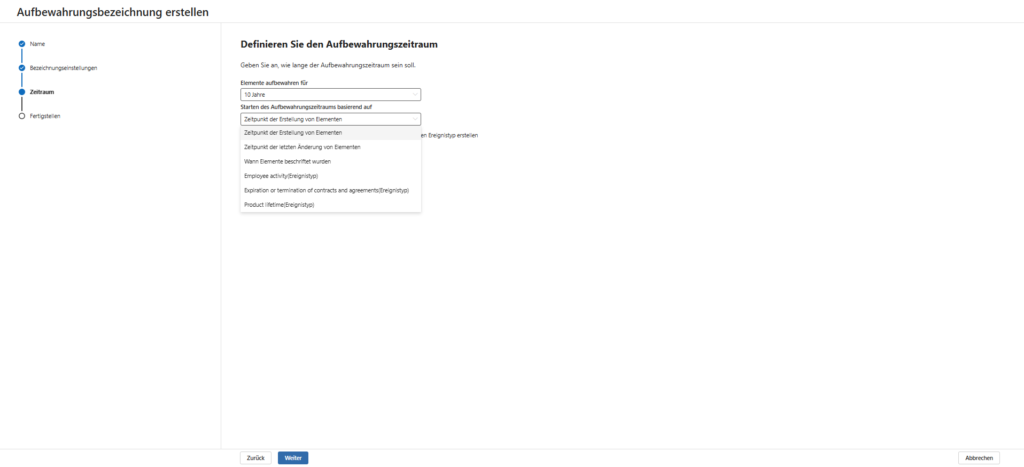
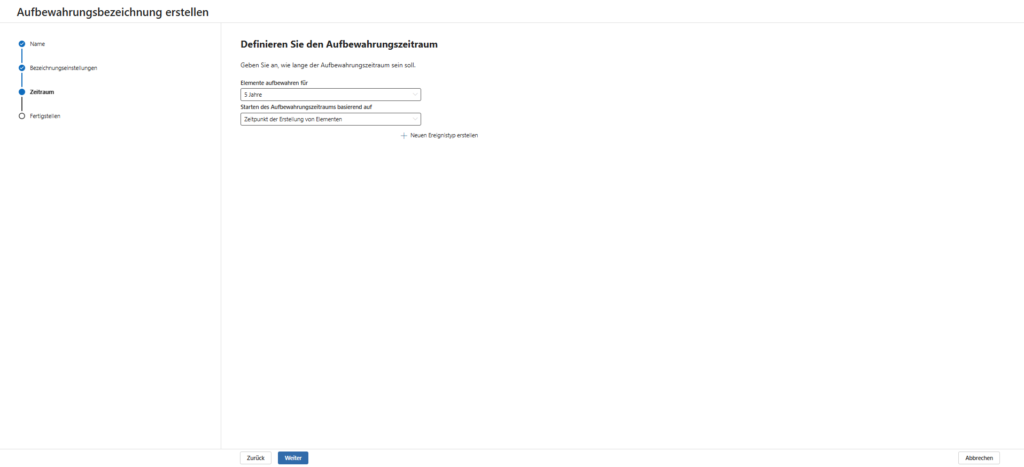
Period & Triggers (When does the clock start?) How long should the clock tick? And important: When does it start? Unlike the global guidelines, labels have three start triggers to choose from:
- Date Created: The standard for GoBD. The clock is ticking from the moment the file was born. No matter what happens after that, after 10 years it's over.
- Modified Date: The "Sliding Window" method. Every time a user edits the file, the deadline is reset and starts all over again. Good for "living documents", bad for rigid archive deadlines.
- When labeled:The unique selling point of labels! The clock only starts at the moment when the label is stuck on the file.
- Scenario: You migrate ancient data from a file server and label it today. The 10 years start today, not from the old creation date of 2015.
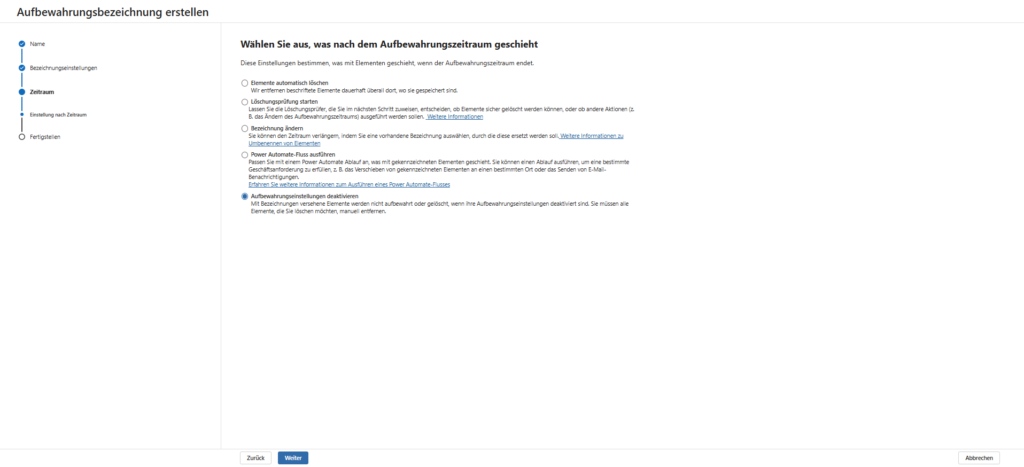
4. What happens after the retention period: This is where you define lifecycle completion. What happens on "Day X" when the 10 years are over? This selection often decides whether you "only" free up storage space or start an audit-proof process.
- Automatically delete items (default E3): The "shredder". Once the clock runs out, the data will be permanently deleted. This is the cleanest solution for GDPR data that needs to go.
- Start Disposition Review | E5): Here, the system does not delete anything automatically. Instead, defined individuals (such as legal or records managers) receive an email notification. You must actively decide in the Purview Portal: "Delete", "Extend" or "Relabel".
- Scenario: This is important for project files, where you don't know today whether they will really be allowed to go in 10 years.
- Scenario: This is important for project files, where you don't know today whether they will really be allowed to go in 10 years.
- Change Name (Relabeling | E5): Instead of deleting it, the system sticks a new label on it.
- Scenario: One document has the label "Contract active (5 years)". After expiration, it is automatically relabeled to "Contract Archive (another 10 years)". This enables complex chains of life cycles.
- Scenario: One document has the label "Contract active (5 years)". After expiration, it is automatically relabeled to "Contract Archive (another 10 years)". This enables complex chains of life cycles.
- Execute Power Automate Flow (E5): The premier class of automation. After the deadline, a custom workflow is triggered.
- Scenario: Before the file is deleted, a flow generates a PDF certificate, moves the file to a "cold storage" archive, or notifies the creator via Teams.
- Scenario: Before the file is deleted, a flow generates a PDF certificate, moves the file to a "cold storage" archive, or notifies the creator via Teams.
- Disable retention settings: The label optically sticks to the file, but loses its "power". The file is again a normal file that can be deleted or edited by the user.
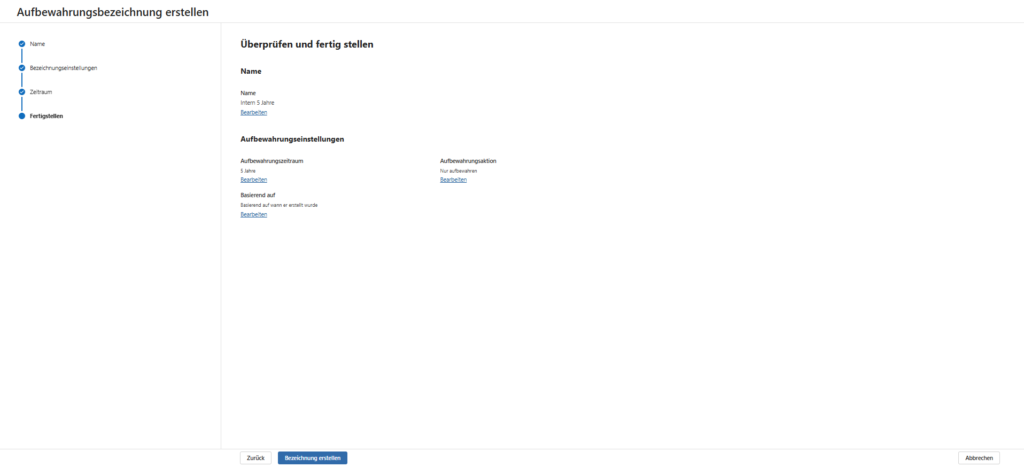
Step 3: Finishing & The Decisive Transition
After clicking on " Create label", the label is technically stored. But Microsoft won't just let you go. A confirmation screen will appear asking "What are the next steps?"
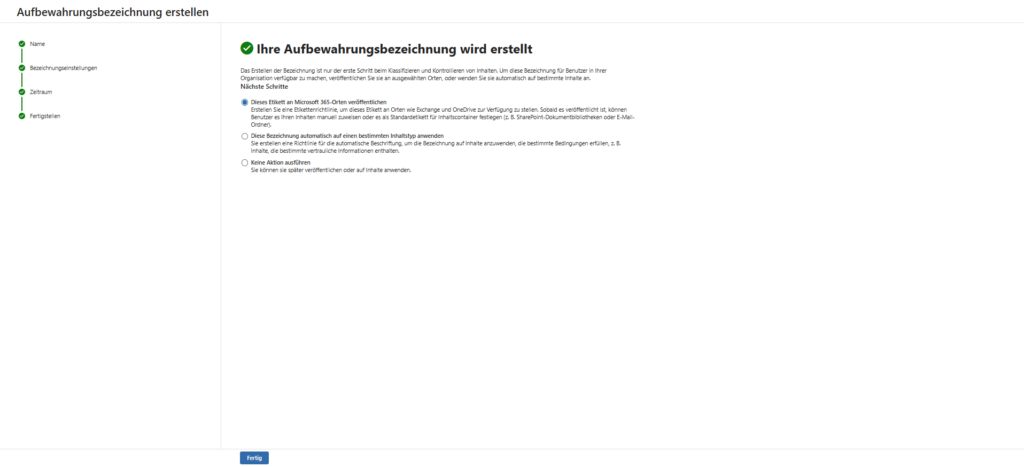
Here you make the decision how (and if) the label gets to the user.
The three options in detail:
- Publish this label to Microsoft 365 locations:
- The Standard Way (E3 & Business): You immediately start the process to make the label visible in Outlook and SharePoint. The user will have to manually select it later.
- Automatically apply this label:
- The Premium Trail (E5): You define a rule (e.g., "Contains credit card number"). The system scans in the background and automatically sticks the label on matching files.
- Just save:
- The Strategist Path: The label will be saved and will end up in your list. But it is not yet visible anywhere.
Rule of thumb (the bearing principle): A label without publication (policy) is like a product that is in the warehouse but not on the supermarket shelf. No one can buy (use) it until you put it on the shelf.
Our recommendation: Select "Do not take any action"
Why? Because you rarely release just one label. In practice, you usually first create a whole set of labels (e.g. "Contract", "Invoice", "Internal"). Only when this set is complete, you put together a package (the policy) and publish them all together.
So click on "Do not take any action" and then click on Done. Your label is now ready in the "warehouse" - in the next article we will show you how to put it on the shelf.

Sei der Erste und starte die Diskussion mit einem hilfreichen Beitrag.
Leave a comment
Dein Beitrag wird vor der Veröffentlichung kurz geprüft — fachlich, respektvoll und auf den Punkt ist hier genau richtig.