
Microsoft Entra ID is the central platform that organizations use to manage their identities and access rights. As soon as you log in to the Entra Admin Center , you will encounter two central views: the personal dashboard (home page) and the client's technical overview. Both provide essential information, but have different focuses.
The Home Page (Dashboard)
Immediately after logging in, you will land on the dashboard. This page is your personal cockpit. It aggregates the health status of the tenant and your own administrative status.
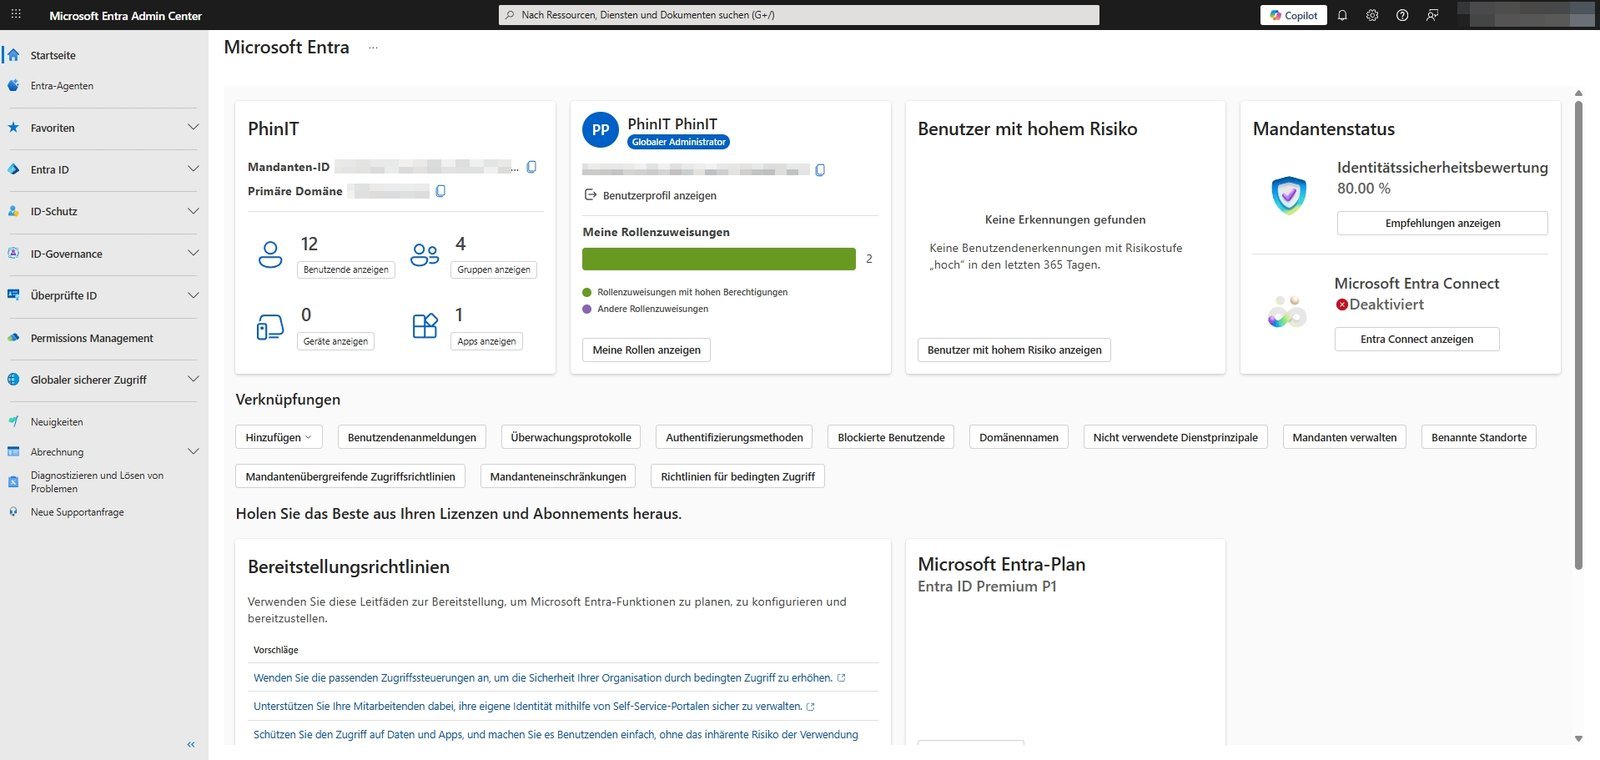
The most important areas here are:
- Quick Access & Status: In the top left, you'll see the tenant name and the primary domain. Below that are counters for users, groups and apps, which take you directly to the respective list with one click.
- Your roles: In the top right, you'll see your own user status (e.g., Global Admin).
- Safety note: Look for the "High Privilege Role Assignments" screen. If you are permanently working with the highest privileges, the use of Privileged Identity Management (PIM) is recommended to minimize risks.
- Safety note: Look for the "High Privilege Role Assignments" screen. If you are permanently working with the highest privileges, the use of Privileged Identity Management (PIM) is recommended to minimize risks.
- Client status: Here, the identity security score (Secure Score) stands out (in the example, approx. 80%). This value shows you how well your tenant is covered compared to best practices.
- Warnings: Tiles like "High-risk users" or Microsoft Entra Connect status (sync) give you instant feedback on potential security incidents or infrastructure issues.
The Identity Overview
If you click on Overview in the menu on the left, you will get to the hard facts of your client. This page is the starting point for technical management.
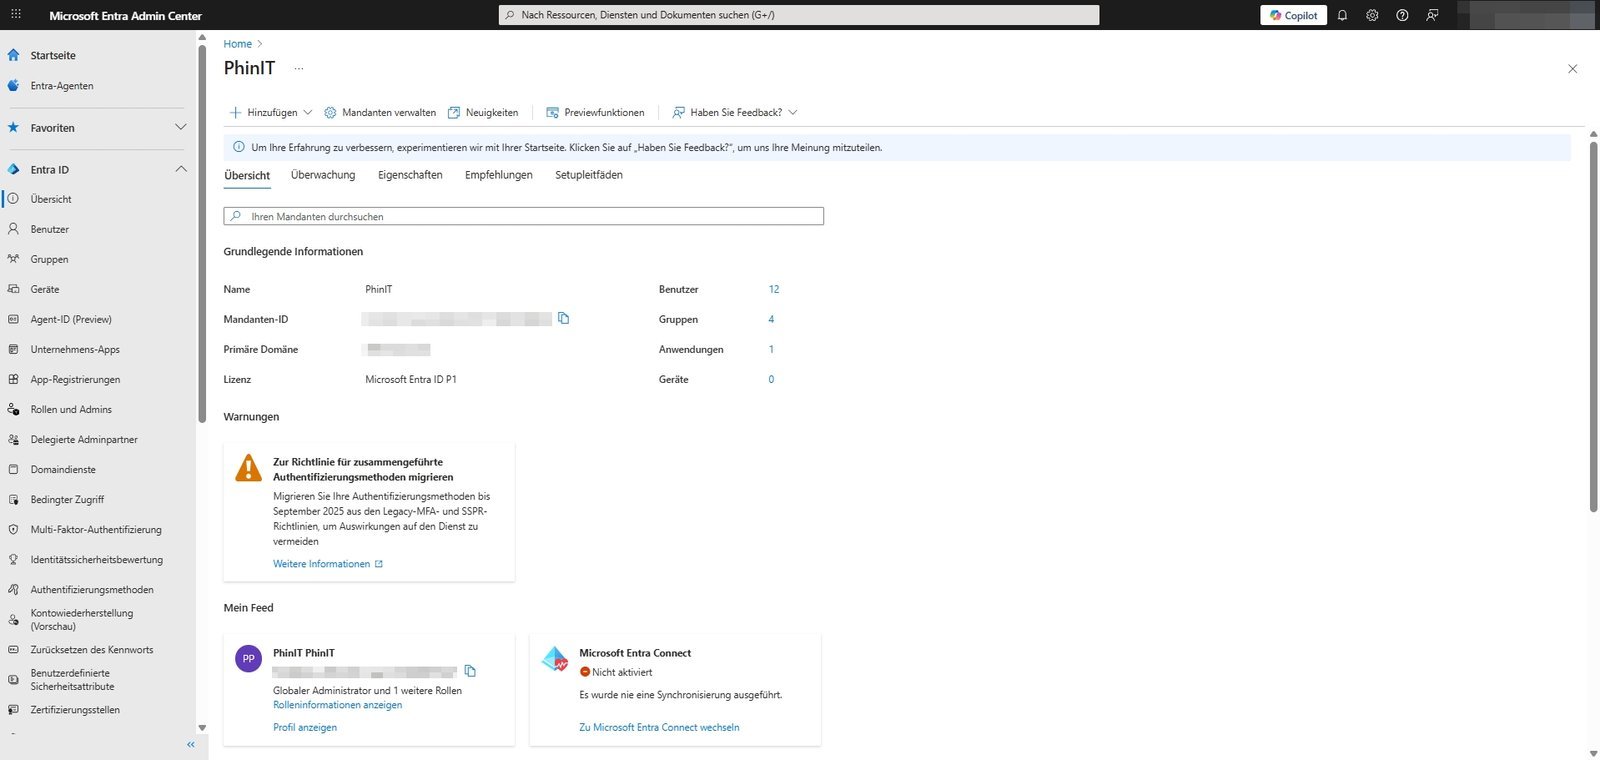
Here you will find the master data you need for configurations, support or scripts:
- Tenant ID: This unique GUID is the "fingerprint" of your environment. You need them for PowerShell scripts, API interfaces, or setting up third-party applications.
- License: The display (e.g., Microsoft Entra ID P1 or P2) is critical to your planning. It tells you whether features such as Conditional Access or Risk-Based Logins are technically available at all.
- Primary domain: The default domain (for example
deine-firma.de, ) that will be used for new user accounts. - Warnings & Notices: Unlike on the dashboard, you'll often see operational warnings here, such as asking you to migrate legacy MFA by a certain deadline.
These two sides form the foundation. While the home page tells you how security is doing, the overview provides you with the technical parameters to work on it.
Overview | Properties - The master data
Clicking on Properties in the menu will take you to your client's administrative master data. Here you don't configure the technology, but the legal and organizational framework.

The most important configuration points are:
- Name: Your organization's display name (for example
[Dein-Unternehmen], ) that users see when they log in or in emails. - Data Location: Here you can see where your identity data is physically stored (e.g. EU Model Clause compliant datacenters / Germany). This information is essential for your processing directory and GDPR compliance.
- Technical & Data Protection Contacts: Be sure to leave up-to-date e-mail addresses here (preferably mailing lists, no personal mailboxes). Microsoft uses these contacts for critical notifications, for example in the event of security incidents that do not end up in the regular Message Center.
Access management for Azure resources
At the bottom of the page, you'll find an inconspicuous but extremely powerful switch: "Access Management for Azure Resources".
- The function: This switch allows you, as a Global Admin, to give yourself (temporary) rights to all Azure subscriptions in the tenant – even those you don't normally have access to.
- Yes: Assigns the User Access Administrator role to your user account at the root level (Root Management Group). This allows you to change permissions for all subscriptions.
- No: The standard operation. You'll only see the Azure resources that you've been explicitly authorized to use.
- When to use? Enable this ("Yes") only in the event of a disaster ("break-glass" scenario), such as when an Azure subscription is orphaned because the original owner has left the company. After the repair, you should immediately turn the switch back to No .
Overview | Recommendations
The Recommendations menu item is not static help text, but an active analysis of your environment by Microsoft's AI. The system compares your configuration to current best practices and security standards.
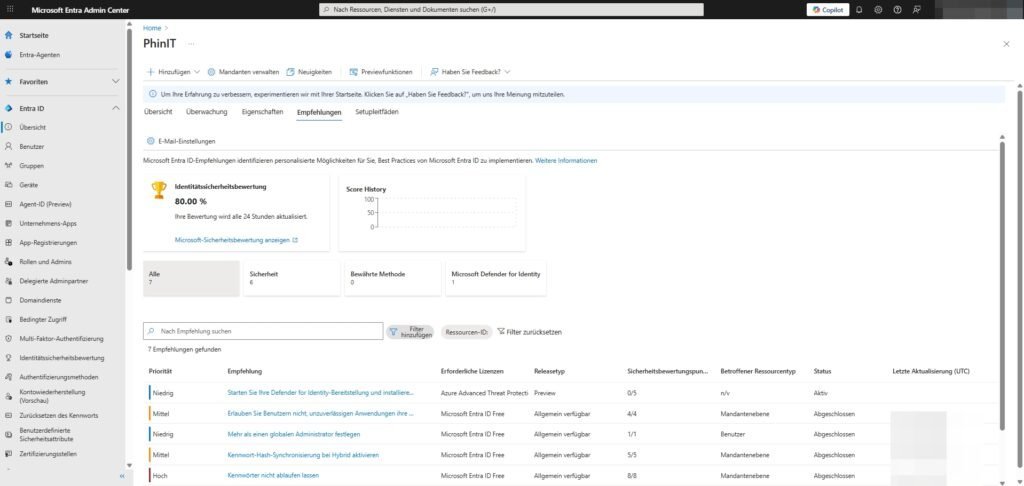
Identity Secure Score
Often you can find a percentage value here or in the linked dashboard (e.g. 80.00%). This score gamifies your security: the more recommendations you implement, the higher the value increases.
Concrete recommendations for action
The list of recommendations is sorted by importance and status. Based on typical scenarios, you'll find hints like:
- Emergency Access (High): "Set more than one global administrator." This prevents you from locking yourself out of your own tenant if an account is compromised or MFA fails.
- Password Security (Medium): "Don't let passwords expire." Microsoft now recommends that passwords should no longer be changed regularly, but instead use strong MFA and detection of compromised credentials.
- App Security (Medium): "Don't allow users to give consent to unreliable applications." This protects against so-called consent phishing attacks.
- Hybrid identity: Notes like "Enable password hash sync" if you're using a local AD connection.
Why is this important? The threat situation is constantly changing. A feature that is safe today may be considered obsolete tomorrow. Looking at the recommendations will help you reduce "technical debt" in the security configuration.
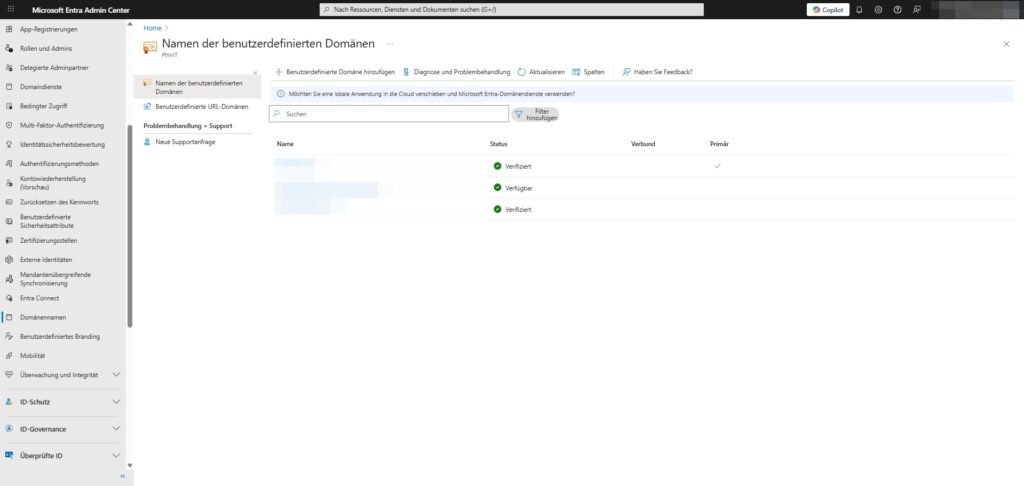
Domain names
By default, every new Microsoft tenant starts with a technical domain (for example deine-firma.onmicrosoft.com, ). Under Domain names , you link your actual company identity (for example [Deine-Firma].de, ) to the tenant. This is the prerequisite for users to be able to log in with their usual email address.
Here's where you manage the lifecycle of your domains:
- Add custom domain: The first step to bringing your corporate identity to the cloud. You can add both root domains and subdomains here.
- Verification (DNS records): Before Microsoft accepts a domain, you must prove ownership. This is usually done via a TXT record (or MX record) that you have to store with your DNS provider (e.g. IONOS, Strato, Cloudflare).
- Note: As soon as the entry is propagated in the public DNS, the status in Entra ID changes from "Unverified" to "Verified".
- Note: As soon as the entry is propagated in the public DNS, the status in Entra ID changes from "Unverified" to "Verified".
- Set primary domain: This is an important comfort setting. The domain marked as "Primary" is automatically used as the default suffix for new user accounts.
- Attention: Changing the primary domain does not retroactively change the User Principal Names (UPNs) of existing users.
- Attention: Changing the primary domain does not retroactively change the User Principal Names (UPNs) of existing users.
- Check status: If there are any problems receiving mail (Exchange Online) or logging in, this is the first point of contact. Check that the status is set to "Verified" and that all required DNS records for the services (M365, Intune, etc.) have been correctly detected.
Important: You can't delete the
onmicrosoft.comdomain. It serves as a technical fallback (e.g. for initial admin accounts) in case there are issues with your custom domain.
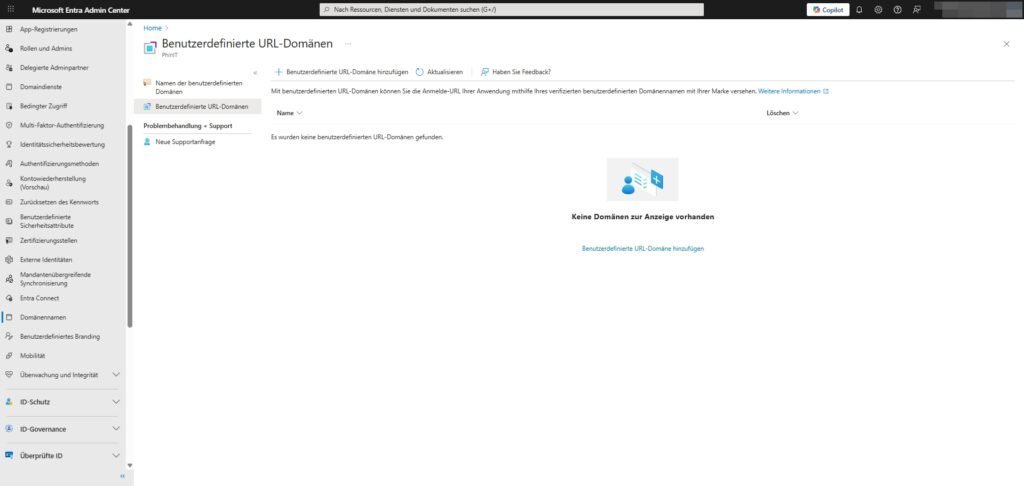
Custom URL domains
Next to the name tab, you'll often find the "Custom URL Domains" tab. Many admins are surprised that it is empty (display: "No custom URL domains were found"). This is completely normal in standard operation.
- The purpose: This feature is primarily part of Microsoft Entra External ID (Customer Identity Access Management - CIAM).
- The goal: If you're deploying applications to customers, you can brand the login URL in its entirety here (e.g.,
login.deine-firma.deinstead oflogin.microsoftonline.com). This strengthens the trust of the end users.
Mobility (MDM and MAM)
Under the menu item Mobility (MDM and MAM), you configure the interface between your identity management and your device management solution – in the Microsoft ecosystem, this is almost always Microsoft Intune.
This area does not control the policies themselves, but the entry point: Are devices automatically enrolled in management when a user logs in?
The difference between MDM and MAM
- MDM (Mobile Device Management): Here, the organization takes full control of the device (e.g., Windows Autopilot, company-owned smartphones). Security policies apply to the entire OS.
- MAM (Mobile Application Management): Here, you only control the work apps and data (e.g., App Protection Policies for Outlook or Teams) without taking over the user's personal device. Ideal for BYOD (Bring Your Own Device) scenarios.
Configuring the User Areas
When you click on the Microsoft Intune application, the settings for the MDM user area and MAM user area are crucial:
- None: Auto-enrollment is disabled. Devices must be added manually.
- Some (Recommended for starting): You select specific groups (e.g., Pilot User or Intune Licensed). Only these users trigger the device registration when logging in.
- All: Every user who logs in to a Windows device with their Entra ID account (even on a private PC at home!) triggers the registration.
Important practical tip: Be careful with the "All" setting in the MDM section when allowing users to use personal Windows devices. It quickly happens that employees connect their private notebook to the business account "only briefly" and accidentally roll the entire device into the company administration. Best Practice: Start with "Some" and a defined pilot group to test the impact on the user experience.

Sei der Erste und starte die Diskussion mit einem hilfreichen Beitrag.
Leave a comment
Dein Beitrag wird vor der Veröffentlichung kurz geprüft — fachlich, respektvoll und auf den Punkt ist hier genau richtig.