... assemble into a PFX file.
Problem: A certificate is delivered with separate files for the public key (CER, CRT) and the private key (KEY), but a combined file (PFX) is required.
Task: Combine the separate files into a PFX file
Guest post by Benjamin Krah | Crow in the Cloud
This article was originally published on Crow in the Cloud here and has been kindly provided to PhinIT by Benjamin Krah. Benjamin regularly publishes posts on Microsoft 365, Azure, Entra ID, Exchange, and other practical topics on his blog Crow in the Cloud.
Option 1: Using a Web-Based Solution
Providers like SSLShopper offer various solutions for handling certificates, such as an SSL converter. This allows the separate files to be conveniently combined into a PFX file. However, the private key is transmitted to the provider in the process, which poses a security risk (even if the transmission is encrypted). This method is therefore only suitable for non-critical certificates, such as those used for test systems unrelated to the company.
Here’s a step-by-step example using SSLShopper:
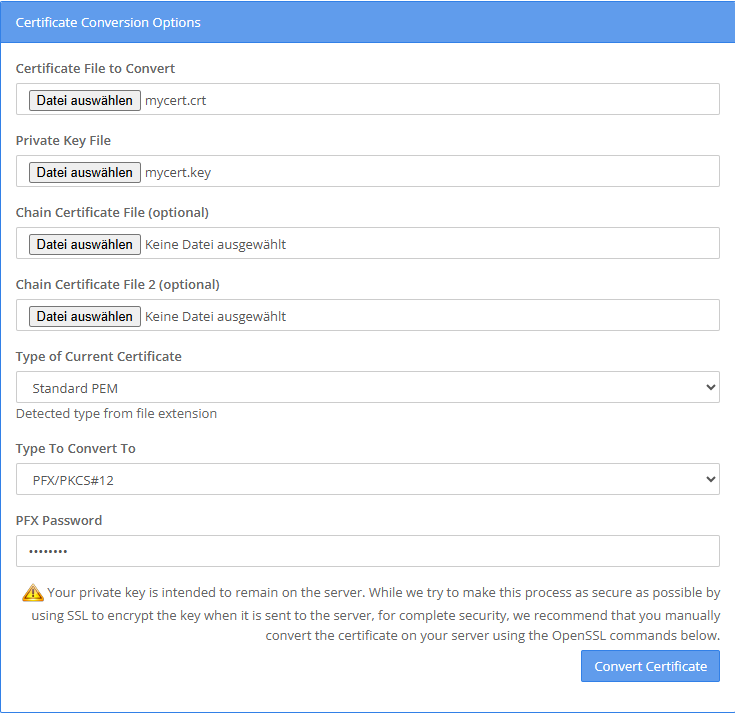
- Open the website: SSL Converter - Convert SSL Certificates to different formats
- Under "Certificate File to Convert," select the file containing the public key (CER, CRT)
- From the dropdown menu "Type To Convert To," choose the option "PFX/PKCS#12"
- Under "Private Key File," select the file containing the private key (KEY)
- In the "PFX Password" field, enter a password for accessing the PFX file
- Click "Convert Certificate"
If the data matches, a PFX file will be generated and downloaded to your local machine.
Option 2: Using a command-line based solution (Windows)
Windows provides a command-line tool called certutil. This tool is actually designed for managing a Windows-based certification authority, but it is included in every Windows operating system. As a result, it can be used not only on servers but also on endpoint devices.
This allows you to merge separate keys into a combined PFX file, among other things. The certificate files must share the same base name (e.g., *mycert.crt* and *mycert.key*), as the tool requires identical filenames for the files. The merge can then be performed using the following command—you will also need to assign a password. For security reasons, the password input is not displayed.
:: In Verzeichnis mit Zertifikatsdateien wechseln, z.B. cd %USERPROFILE%\Downloads
cd "<Pfad>\<zu den Dateien>"

:: Dateien zusammenführen, z.B. certutil -mergepfx mycert.crt mycert.pfx
certutil -mergepfx <Dateiname>.crt <Ziel-Dateiname>.pfx
The new file is then created in the same folder.
Option 3: Using a command-line based solution (Windows or Linux)
If a Linux system is available for configuration, OpenSSL can be used. This solution can also be employed on Windows if certutil fails for any reason. However, on Windows, OpenSSL must first be downloaded and installed separately. Regardless of the platform, the following commands are used for creation. A password must be assigned, which is not displayed for security reasons:
openssl pkcs12 -export -out <Zieldatei>.pfx -inkey <Privater Schlüssel>.key -in <Öffentlicher Schlüssel>.crtYou may need to change to the directory containing the files before executing.

Crow in the Cloud is the blog by Benjamin Krah. It focuses on Microsoft 365, Azure, Entra ID, Exchange, and related IT topics.
The blog publishes insights from projects, technical analyses, and proven solutions for administrators and IT professionals. The goal is to present knowledge in an understandable way and help avoid common pitfalls in daily operations.

Sei der Erste und starte die Diskussion mit einem hilfreichen Beitrag.
Leave a comment
Dein Beitrag wird vor der Veröffentlichung kurz geprüft — fachlich, respektvoll und auf den Punkt ist hier genau richtig.